Technical Project Lead @ Huawei Technologies

My photo
Bangalore/Hyderabad, Karnataka/Andhra Pradesh, India
Have an overall 13 + yrs of experience Currently working as an Senior Architect.Expertise in design,implementation of Automation frameworks for Opensource automation tools like Selenium,Jmeter, Webdriver,Appium, Robotium Expertise in integrating Test & ALM Management tools like Rally,Qmetry,JIRA-Zephyr with Automation frameworks Expertise in design and developmenet Mobile Automation frameworks for tools like Appium, Robotium Remote Control,Cucumber BDD,Manual Testing

Followers

Tuesday, October 26, 2010

Parallel distribution of RCTests using Selenium Grid and TestNG

Before getting into Selenium Grid, I would like to show some light on how to achieve distribution and Parallelism using Selenium Grid. Also its time to switch from Test NG over Junit because of TestNG flexibility over unit testing

What is Selenium Grid?
Selenium Grid is an extension of Selenium RC to distribute your tests across multiple platforms
saving you time by running tests in parallel.

TestNG in context to Selenium Grid.
TestNG comes into picture when you want to achieve parallel execution of Selenium RC tests . However there are different frameworks to achieve this parallelism. I found TestNG as a Simple and Powerful Testing Framework that can be integrated alongside of Selenium RC scripts or for Unit Testing purpose. Frameworks like Junit are bound to unit testing. There are times where might require to do an integration testing @ code level.Test Frameworks like Junit has this limitation.TestNG goes a bit beyond the Unit testing and even supports Integration testing too.


Configuring Test NG Plugin in Eclipse
Below are the simple steps on how to configure TestNG as a plug in to Eclipse

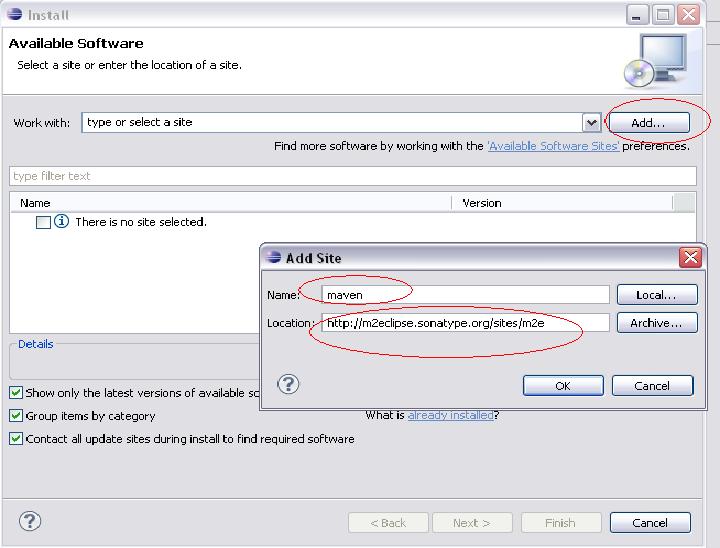
  1. Go Eclipse menu Help >> Install New Software, click on Add.. button
  2. Type some name ex TestNG.
  3. Enter this url http://beust.com/eclipse
  4. Click on Ok button.
  5. Now select TestNG from "Work With" drop down.
  6. Select the TestNG plugin
  7. Click on Next again Next .
  8. Accept the License Agreement
  9. Click on finish Button.
  10. Allow eclipse to download the plugin in background
  11. On Prompt, Restart the eclipse.


Step by Step Configuring Selenium Grid Setup
  1. Download the latest selenium grid from the Official Selenium site >> http://selenium-grid.seleniumhq.org/download.html.  Latest one available at the time of writing this blog is 1.0.8
  2. You  Need to have some prerequisites in order to control and configure Grid. So before we go for configuring the grid we will see how to configure Ant. But a question might arise on why we require ant in Grid Context. He is the answer . Selenium Grid uses ant targets to start or launch the Grid. Also the package comes with ant targets to launch Remote Control on desired port
  3. Now download ant from http://ant.apache.org/bindownload.cgi
  4. Unpack the zip and add the ant bin path (ex: D:\Software\Automation\Tools\ant\Ant\apache-ant-1.8.1\bin) to the System Variable Path

4. Also ensure that your JAVA_HOME is added to user variable

 5.Now open the command prompt and type the command ant -version. You should be able the following if you ant is configured properly. Else follow the previous steps and ty again
you should be able to see the below output when u run the command $ ant -version
>> Apache Ant version 1.8.1 compiled on April 30 2010

6.Now the Ant configuration is complete
7.We just need to run few Ant commands to launch the Grid Hub and register multiple remote control to the Hub.
8.Let us consider a scenario where we have some tests that needs to be run against both firefox and as well as on chrome and how do we get these tests run paralley on both firefox and chrome at a time
9.Firstly we need to start the grid . Go to the directory where your grid is located. Open the command prompt and change the directory to the selenium grid(ex:E:\Softwares\Selenium\selenium-grid-1.0.7) where the build.xml exists
10.Now run the following command $ ant launch-hub
11.This will launch the Selenium Grid on 4444 port.
12.Now you need to register 2 remote controls to Grid. One RC for running Firefox tests and the other for Chrome tests
13.Open the command prompt from the Grid directory and run the following command
ant -Dport=5556 -Denvironment=*firefox launch-remote-control . This will start Remote Control instance on 5556 and will be listening to grid
14. Open another command prompt from the Grid directory and run the following command
ant -Dport=5557 -Denvironment=*googlechrome launch-remote-control . This will start Remote Control instance on 5557 and will be listening to grid.
15.Lets try to check whether the remote control really is registered to Grid.
16.Open the browser and run the following URL http://localhost:4444/console. On opening this url you should be able to see the following RCs registered to grid


17.Now our setup is ready what's next ?.................Next ?? We just need to run our scripts against these RC. So simple as this statement right ;)
18.Hmm Now How to run Test Scripts against multiple RCs parallely
19.Below steps shows how to create sample test script which will automate Google.com on Firefox as well as Chrome browsers concurrently.
20.From the eclipse create a New Java Project.
21.How are we going to write our tests ?? We will use Test NG to write our scripts.As in the initial statement, we discussed TestNG in context to Selenium Grid. This is where exactly TestNG is used
22. Here we are going to integrate TestNG alongside of Selenium RC scripts in order to achieve the distribution of tests among multiple browsers
23. We will now create a sample Selenium RC script with TestNG and we will see how the script runs on multiple browsers
24. Create an eclipse Java Project
25.Create a class of type TestNG class
26. Select the source folder , set package name, Test Class and select the @BeforeClass and @AfterClass annotations. These are exactly same as that of Junit 4 annotations


27.Provide the XML Suite file name as testng.xml . Click on Finish button
28.Now your eclipse should create a class as shown in figure Below
29.Open the testng.xml under src folder and copy/paste the below stuff


<suite name="Suite" parallel="tests">
    <test name="IexploreTests">
        <parameter name="selenium.host" value="localhost"></parameter>
        <parameter name="selenium.port" value="5556"></parameter>
        <parameter name="selenium.browser" value="*firefox"></parameter>
        <parameter name="selenium.url" value="http://www.google.com"></parameter>
        <parameter name="searchCriteria" value="IExploreTests"></parameter>
        <classes>
            <class name="com.mycompany.GoogleTest" />
        </classes>
    </test>
    <test name="FirefoxTests">
        <parameter name="selenium.host" value="localhost"></parameter>
        <parameter name="selenium.port" value="5557"></parameter>
        <parameter name="selenium.browser" value="*firefox"></parameter>
        <parameter name="selenium.url" value="http://www.google.com"></parameter>
        <parameter name="searchCriteria" value="FirefoxTests"></parameter>
        <classes>
            <class name="com.mycompany.GoogleTest" />
        </classes>
    </test>
</suite>
30. I had created 2 tests with name 'IexploreTests'  and 'FirefoxTests'
31.This is just to drive a single testcase on different browsers. If you want to run the test on Chrome, We will have to create another test parameter with different RC configurations.
32.Also parallel parameter should be set to tests inorder to run these test parallely on multiple browsers
33.Now open the testng class which I had created under step 26
34. Copy and Paste the below code into the testng class and Save it
35.In the below code, i had created one test which Im parameterizing with different sets of values from testng.xml

 package com.mycompany;

import org.testng.annotations.AfterClass;
import org.testng.annotations.BeforeClass;
import org.testng.annotations.Parameters;
import org.testng.annotations.Test;

import com.thoughtworks.selenium.DefaultSelenium;
import com.thoughtworks.selenium.Selenium;

public class GoogleTest {
    Selenium selenium;

    @BeforeClass
    @Parameters({ "selenium.host", "selenium.port", "selenium.browser",
            "selenium.url" })
    public void beforeClass(String host, String port, String browser, String url) {
        this.selenium = new DefaultSelenium(host, Integer.parseInt(port),
                browser, url);
        this.selenium.start();
        this.selenium.open("");
    }

    @AfterClass
    public void afterClass() {
        this.selenium.close();
        this.selenium.stop();
    }

    @Test
    @Parameters({ "searchCriteria" })
    public void testGoogleSearch(String criteria) {
        this.selenium.type("name=q", criteria);
        try {
            Thread.sleep(15000);
        } catch (InterruptedException e) {
            // TODO Auto-generated catch block
            e.printStackTrace();
        }
    }   
}


35.To run the tests, open the Testng.xml and right click >> Run as >> Run Configurations
36. Select TestNG from the left list
37. Click on Add (+) button on the topleft
38.Select the project
39.Select the TestSuite as src/testng.xml
40.Apply and run the settings
41.Now you should be able to run the tests on multiple browsers parallely

Wednesday, October 20, 2010

Selection of Dymanic Combo Values

There are 2 cases where the Combo Box goes dynamic
1.ComboBox it self is an ajax element
2.The Combovalues gets dynamically populated on some event trigger

Point 1 can be handled using selenium.waitForCondition()
How about point 2 ? Below is the code

public class DynamicComboElementHandling {
    static Selenium selenium;
    static SeleniumServer server;

    /**
     * @param args
     * @throws Exception
     */
    public static void main(String[] args) throws Exception {
        // TODO Auto-generated method stub
        selenium = new DefaultSelenium("localhost", 4444, "*firefox",
                "http://www.google.com");
        server = new SeleniumServer();
        server.start();
        selenium.start();
        //Click on Google Advanced Search Link
        selenium.open("/advanced_search?hl=en");
        //Wait Until the Drop appears on the screen
        selenium.waitForCondition("selenium.isElementPresent(\"name=num\");",
                "15000");
        boolean flag = true;
        while (flag) {
            //Get the count of the drop down values
            int optionCount = selenium.getSelectOptions("name=num").length;
            // if the dropdown is populated with values, come out of the while
            // loop
            // else continue looping until the count is > 0
            if (optionCount > 0) {
                break;
            }
            continue;
        }
        //This code will be executed only if dropdown has some values
        //else the execution control will be inside the while loop until the
        //drop down values gets populated
        String[] options = selenium.getSelectOptions("name=num");
        for (int i = 0; i < options.length; i++) {
            if (options[i].equals("50 results")) {
                selenium.select("name=num", options[i]);
                break;
            }
        }

        Thread.sleep(3000);
        selenium.close();
        selenium.stop();
        server.stop();

    }

}

Thursday, October 14, 2010

How to get the Width and Height of Images or Elements

 public class ImageTests {

    /**
     * @param args
     */
    public static void main(String[] args) {
        // TODO Auto-generated method stub:
        Selenium selenium = new DefaultSelenium("localhost",4444,"*firefox","http://www.google.com");
        selenium.start();
        selenium.open("");
        //Print the Width of the Image
        System.out.println("Width Of Image is : " + selenium.getElementWidth("logo"));
       
        //Print the Height of the Image
        System.out.println("Height Of Image is : " + selenium.getElementHeight("logo"));   
       
        selenium.close();
        selenium.stop();
       
    }

}

Tuesday, October 12, 2010

How to do Data Driven Testing

Simplest way to drive the gui components using different sets of data is from a properties file. However we can use excel sheets as our data source. For small sets of data we can use the properties file

Here is the step by step Procedure which gives an idea on how to drive the Google search text box with different sets of data from a properties file

1.Create a Java Project in Eclipse.
2.Right click on the Source folder , go to File >> New >> File
3. Provide file name of your choice with an extension .properties . Ex give the file name as datapool.properties and click on Finish button
4. After clicking on Finish you should be able to see the file in the Project Explorer of eclipse as shown below
5.Open the datapool.properties, enter the key. Just copy paste the below line in the properties file & save the file .Refer below snapshot
Search_Criteria=SeleniumRC,SeleniumIDE,SeleniumGRID

6. Now that we have different sets of data in a resource called datapool.properties.
7.Next step is to read the properties file
8.Now create a Resource bundle object that reads the properties file
9.Now using the bundle object, Read the line of the properties file using the key Search_Criteria" 
10. bundle.getString("Search_Criteria") will return you the string of values for the specified key. 9.Now the String criteria will have value "SeleniumRC,SeleniumIDE,SeleniumGRID".
11.We will use the Java Utility called String Tokenizer to beak the above String into individual tokens identified by comma.
12.After Splitting for each token we will fill in the Google Search Text Box.
13.Copy the code from the below Image in your eclipse and run it

Below is the snapshot of the code

Monday, October 11, 2010

Selenium Automation Framework

**Coming Soon....

Continuous Integration using Hudson

***Coming Soon

How to get the count of Checkboxes and Select them all

Lets take a webpage having multiple check boxes. How do I get the count of all checkboxes and how do I select them
1.Go to the following link and you will find checkboxes under Search Language. Below Code Snippet instructs selenium to get the check box count and select all the checkboxes one by one

    http://www.google.co.in/preferences?hl=en


import org.junit.AfterClass;
import org.junit.BeforeClass;
import org.junit.Test;
import org.openqa.selenium.server.SeleniumServer;
import com.thoughtworks.selenium.DefaultSelenium;
import com.thoughtworks.selenium.Selenium;

public class AjaxTests {
    static SeleniumServer server;
    static Selenium selenium;

    @BeforeClass
    public static void setUpBeforeClass() throws Exception {
        server = new SeleniumServer();
        server.start();

        selenium = new DefaultSelenium("localhost", 4444, "*iexploreproxy",
                "http://www.google.com");
        selenium.start();
        selenium.open("/preferences?hl=en");
        selenium.windowMaximize();
    }

    @AfterClass
    public static void tearDownAfterClass() throws Exception {
        selenium.close();
        selenium.stop();
        server.stop();
    }
  

    @Test
    public void testAllCheckBoxes(){
         //Get the count of all available check boxes

         int checkBoxCount = selenium.getXpathCount("//form[@name='langform']/table[5]/tbody/tr[2]/td[3]
                                          /table/tbody/tr/td/font[1]/label/input").intValue();
        //Print the Check box count
        System.out.println("Total Number of Check box count is : " + checkBoxCount );
        int count = selenium.getXpathCount("//form[@name='langform']/table[5]/tbody/tr[2]/td[3]/table/tbody
                          /tr/td[1]/font[1]/label").intValue();
        System.out.println(count);
        for (int i = 1; i <=4; i++) {
            for (int j = 1; j <= count; j++) {
                if(i == 4 && j == 11){
                    break;
                }
                selenium.check("//form[@name='langform']/table[5]/tbody/tr[2]/td[3]/table/tbody/tr/td[" + i +
                              "]/font[1]/label"+"[" + j +"]/input");
              
            }
        }
      
    }
  
}

Saturday, September 18, 2010

Starting Selenium Server on a specific port

java -jar selenium-server.jar -port 4445

Programatically Starting Selenium Server to accept SSL Certificates

  public static void startServerInProxymode(){
        // Precondition for the entire test class is Login
        ServerSocket serverSocket;
        try {
            serverSocket = new ServerSocket(RemoteControlConfiguration.DEFAULT_PORT);
            serverSocket.close();
        } catch (IOException e) {
            // TODO Auto-generated catch block
            System.out.println("Failed to create socket connection on Default PORT");
            e.printStackTrace();
        }
       
        RemoteControlConfiguration rcc = new RemoteControlConfiguration();
        rcc.setTrustAllSSLCertificates(true);
        rcc.setPort(RemoteControlConfiguration.DEFAULT_PORT);
        try {
            server = new SeleniumServer(false,rcc);
            server.start();
        } catch (Exception e) {
            // TODO Auto-generated catch block
            e.printStackTrace();
        }
       
    }

Wednesday, September 15, 2010

Generating Junit HTML Reports using Maven


To Generate HTML reports using maven follow the below steps
1.Firstly we have to create a Maven Project using eclipse
2.Inorder to create a Maven Project in eclipse your eclipse should have maven plugin
3.To Download maven pulgin see below steps
4 . Open Eclipse and go to Help. Select Install New Software


5.Click on add button. Now addsite dialog gets opened.
6.Provide the Name and Location and then click on ok button as shown in below snapshot


6. Wait for few seconds until the maven plugin is displayed in the list (refer below snap shot)
7. Select the checkbox option "Maven Integration for Eclipse" and click on Next Button
8. Select the plug in and click on Next Button as shown below


9. Accept the license agreement and click on Finish Button


10.The download and installation happens in background as shown below 
11.On Successful installation you would be prompted for eclipse restart. Accept the restart confirmation to restart your eclipse
12. Your eclipse is now plugged in with Maven plugin with which you can create Maven Projects
13. Ignore the console messages where eclipse tries to download maven plugins
14. Maven will create a .m2 (maven directory) folder in user directory where all the dependencies (jars are saved)
15. Go to user directory ex: C:\Documents and Settings\kiran\.m2.
16. Under .m2 directory you should see repository folder


17. Now your Eclipse is ready to create Maven Project
18. From here we will see creating Maven Projects in eclipse
19. In Eclipse navigate to File >> New Project >> Maven >> Maven Project
20. Click on Next again Next and wait for a while until the Group Ids are populated 
21. Select the default Group ID as shown in below fig and click on next

22. Provide groupid, artifactid and package as shown in below figure and click on Finish button


23. Now in you eclipse you should be able to see the Project in you eclipse package explorer


24. This project will have 2 src folders namely src/main/java for writing your AUT code and src/main/test for maintaining you Junit Tests
25 . Also you can see Maven Dependencies and a pom.xml
26. You Pom.xml is used to specify the required dependencies for your project (ex: selenium,junit ....)
27. By Default, Pom.xml will have a dependency of Junit 3.8.2 version. Change the version from 3.8.2 to Junit 4.0 and save the pom.xml. Now observe that you Maven dependencies will be updated to Junit 4 jar. So what ever dependencies you wish, you can provide the dependency in pom.xml. Maven will download the specified dependency from central repository and saves them in local repository C:\Documents and Settings\kiran\.m2\repository


  <dependencies>
    <dependency>
      <groupId>junit</groupId>
      <artifactId>junit</artifactId>
      <version>4.0</version>
      <scope>test</scope>
    </dependency>
  </dependencies>
</project>

28. From here we will create some Selenium Tests. So In your eclipse, under src/main/test directory, com.company package, create a Junit test class with name GoogleSearchTest.java. Delete or the default AppTest.java

package com.company;

import org.junit.AfterClass;
import org.junit.BeforeClass;

public class GoogleSearchTest {

    @BeforeClass
    public static void setUpBeforeClass() throws Exception {
    }

    @AfterClass
    public static void tearDownAfterClass() throws Exception {
    }   


}


29. Now add some testcases to the above testClass . We will add two test methods(testcases) namely testGoogleSearch()  and testGoogleAdvancedSeach(). Your test class looks like this


 package com.company;

import org.junit.AfterClass;
import org.junit.BeforeClass;

public class GoogleSearchTest {

    @BeforeClass
    public static void setUpBeforeClass() throws Exception {
    }

    @AfterClass
    public static void tearDownAfterClass() throws Exception {
    }


    @Test
    public void testGoogleSearch(){
       
       //To implement Selenium Tests here
    }
   
    @Test
    public goid testGoogleAdvancedSearch(){
     
      //To implement Selenium Tests here
    }
}
Note** : Maven requires JDK1.5 and above . Configure eclipse with JDK 1.5 conpliance


30. Now we have to implement selenium tests in the two testmethods. For that we require Selenium RC Jars.
31. Open the pom.xml and ad the following dependency to Dependencies tag <dependencies></dependencies>
add the below dependency tag to your dependencies tag


<dependencies>
<dependency>
        <groupId>org.seleniumhq.selenium</groupId>
        <artifactId>selenium-remote-control</artifactId>
        <version>1.0.1</version>
        <type>pom</type>
    </dependency>

 <dependency>
        <groupId>org.apache.maven.plugins</groupId>
        <artifactId>maven-surefire-report-plugin</artifactId>
        <version>2.5</version>
        <type>maven-plugin</type>
    </dependency>

</dependencies>

32 . also add plug in for html report generation


 <reporting>
    <plugins>
      <plugin>
        <groupId>org.apache.maven.plugins</groupId>
        <artifactId>maven-surefire-report-plugin</artifactId>
        <version>2.5</version>
        <configuration>
          <outputName>RadaptiveTestResults</outputName>
          <includes>
            <include>SmokeTest.java</include>
          </includes>                
        </configuration>
      </plugin>
    </plugins>
  </reporting> 


33. On a whole your pom.xml should look like this (replace your pom.xml content with below xml content)


<project xmlns="http://maven.apache.org/POM/4.0.0" xmlns:xsi="http://www.w3.org/2001/XMLSchema-instance"
  xsi:schemaLocation="http://maven.apache.org/POM/4.0.0 http://maven.apache.org/xsd/maven-4.0.0.xsd">
  <modelVersion>4.0.0</modelVersion>

   <groupId>com.company</groupId>
  <artifactId>MyMavenProject</artifactId>
  <version>0.0.1-SNAPSHOT</version>
  <packaging>jar</packaging>

  <name>MyMavenProject</name>
  <url>http://maven.apache.org</url>

  <properties>
    <project.build.sourceEncoding>UTF-8</project.build.sourceEncoding>
  </properties>

 <dependencies>
    <dependency>
      <groupId>junit</groupId>
      <artifactId>junit</artifactId>
      <version>4.5</version>
      <scope>test</scope>
    </dependency>   
    <dependency>
        <groupId>org.seleniumhq.selenium</groupId>
        <artifactId>selenium-remote-control</artifactId>
        <version>1.0.1</version>
        <type>pom</type>
    </dependency>   
    <dependency>
        <groupId>org.apache.maven.plugins</groupId>
        <artifactId>maven-surefire-report-plugin</artifactId>
        <version>2.5</version>
        <type>maven-plugin</type>
    </dependency> 
 </dependencies>
    <reporting>
    <plugins>
      <plugin>
        <groupId>org.apache.maven.plugins</groupId>
        <artifactId>maven-surefire-report-plugin</artifactId>
        <version>2.5</version>
        <configuration>
          <outputName>GoogleSearchTestResults</outputName>                  
        </configuration>
      </plugin>
    </plugins>
  </reporting>   
</project>


34 . Save the pom.xml. Now in your eclipse,under Project Explorer you should be able to see the selenium dependencies added as shown below


35. Now we have selenium dependencies and fill in the test methods with selenium implementations

36. Now we are ready with tests. How to generate HTML reports??
We will generate HTML reports from command prompt using maven commands. Before that to run maven commands from command promopt we should have maven jars.

37. Now go to the following link and download maven jars
http://www.apache.org/dyn/closer.cgi/maven/binaries/apache-maven-2.2.1-bin.zip

38.Extract the maven.zip on to you local directory

39.set Maven/bin path in system environment variables path
Open SystemProperties, click on advanced tab, edit the path and set the maven/bin in the path. click on ok button. See below

40.Maven requires JDK to execute the maven tasks. Set the JAVA_HOME USER variable
See below on how to set JAVA_HOME user variable


41. Apply the changes
42. Now to ensure that maven works, open the command prompt and type mvn -version
you should see the reponse some thing like this


Apache Maven 2.2.1 (r801777; 2009-08-07 00:46:01+0530)
Java version: 1.6.0_18
Java home: C:\Program Files\Java\jdk1.6.0_18\jre
Default locale: en_US, platform encoding: Cp1252
OS name: "windows xp" version: "5.1" arch: "x86" Family: "windows"


43.Now maven setup for command prompt is ready and from the command prompt change the directory where your Maven project pom.xml is located 
 44. Now type the command mvn site. This  will run your tests before running tests, maven   will download the required maven plugin.
 45.On running the above command you should be able to see the below response in the command line console


46. Go to your project target/site directory ex: E:\eclipse\myworkspace\MyMavenProject\target\site and check for the html report generated with the name GoogleSearchTestResults.html. this is the one we have specified in pom.xml  

 47 Open GoogleSearchTestResults.html.You  should see a beautiful HTML Test Report with Pass Faill Results


Tuesday, September 7, 2010

How to Handle Windows if there are no titles


If your application has a link or a button which opens a new window, and you want to perform some action on the newly opened window though selenium, it's not that hard to handle if you have title, name or the variable associated with that window.

However this is not the case always, sometime you don’t have name of the window or any variable associated with it, and you are not even able able to identify window using title, at the time selenium sucks to identify the window. However there are some alternative ways to resolve this (which might work, not sure). But before we see that let’s see how to select the windows that can be identified easily.


Select window using SelectWindow API

    * Title
    * Name
    * Variable Name (variable to which window is assigned)
    * Inbuilt APIs to retrieve Windows Names, Titles and IDs

When SelectWindow API fails to Identify Window....


Select window using SelectWindow API >> Selenium provides the selectWindow API which takes any of the following argument to identify the window.

Title: Use whatever appears on title bar of the window you want to select as argument to selct window API.

However be careful while using title to select the window. Because it may happen that multiple windows have same titles.And in this case Selenium just says that it will choose one, but doesn't mention which one. If this is the case where both have same title I would suggest not to use the title for selecting window. And sometimes the titles of windows are dynamic, and that may create some extra noise.

Name: You can use windows name to identify the window.

For example if the code to open a new window is like as below.
window.open("http://google.co.in","Google Window");

(The second parameter here is windows name. Developer uses this to identify the window in order to use that in further part of the coding.)

You can use "Google Window" as the argument to selectWindow, to select the window as shown below if the code to open the window is as shown above.

selenium.selectWindow("Google Window"); // select new window
//Do whatever you want to do on new window
selenium.close(); //Close the newly opened window
selenium.selectWindow(null); //To choose the original window back.

Variable name: If opened window is assigned to some variable you can use that variable to identify and select that window.

For example if the code to open a new window is like as below.

GoogleWindow = window.open("http://google.co.in");
 
You can use "GoogleWindow" as argument to SelectWindow API, to select the window as shown in the code.

1.selenium.waitForPopUp("GoogleWindow", "30000");
2.selenium.selectWindow("GoogleWindow");
3.//Execute steps on new window
4.selenium.close(); //close the new window
5.selenium.selectWindow("null"); // select original window.

Using inbuilt API to retrieve Windows Names, Titles and IDs


Selenium provides some APIs to find out the names, Titles and IDs of the all opened windows. So you can use this APIs with SelectWindow API to select the window.

getAllWindowNames() – this will return you the array of all the opened windows names.
getAllWindowTitles() - this will return you the array of all the opened windows names.
getAllWindowIDs() - this will return you the array of all the opened windows names.

So if you have opened only single window you can use something like this to select the newly opened window.

1.selenium.selectWindow(getAllWindowNames()[1]);
OR

1.selenium.selectWindow(getAllWindowTitles()[1]);
OR
1.selenium.selectWindow(getAllWindowIDs ()[1]);

When SelectWindow API fails to Identify Window??


Sometimes it happens that you use all the things to select the window but it fails to identify the windows. At the time you can use one of the following ways

Check the selenium logs.!!!

The document of the selectWindow API says that if selenium is not able to identify the window after using all the things mention above you should check out for the window name in selenium log. To do that just start your selenium server with –log argument, something like following:

Java – jar path of selenium-server.jar –log log.txt

Write down the test case to open the window and execute it. Now shutdown the selenium server and checkout the logs for something like this.

Debug: window.open call intercepted; window ID

If you find this you can use this window ID to identify and select the window as the argument to selectWindow API.

Selecting the Window Using openWindow API

Sometimes selenium is not able to identify the window, one of the case is when the window is opened through onload event. Something likes this

<body onload='window.open("http://google.co.in");'>

In this case you can force selenium to identify the window using openwindow command, with URL as blank and name as you like.

1.Selenium.openWindow("","MyWindow");

2.selenium.selectWindow("MyWindow");

But if your window is not opening through onload event, and though selenium is not able to select the window after doing all the above things. The only thing left is to open the window using openwindow API with URL same as it would be if would have been opend through button or link click and name as you like. Something like as below.

1.Selenium.openWindow("http://google.co.in","MyWindow");
 
2.Selenium.selectWindow("MyWindow");


 ****Note : This article has been picked from Gauraung Shah's blog. Thanks!!! for his very detailed explanation

Executing a batch file which which starts Selenium Server

Runtime.getRuntime().exec("cmd /c start SeleniumStart.bat");

How to programatically find the RC Server port??

SeleniumServer server = new SeleniumServer();
server.start();
System.out.println(server.getPort());

How do I highlight an input field using Selenium??

use selenium.highlight("name=q");

Saturday, September 4, 2010

How to get the current URL using Selenium??

Use this command to print the current URL
System.out.println(selenium.getLocation());

How to shut down Selenium Server if it is already running on port 4444

There are chances that when you are running tests, the server might not be shutdown properly. In this case, when you try to re-run your tests, you may encounter the following error

java.net.BindException: Selenium is already running on port 4444. Or some other service is.
    at org.openqa.selenium.server.SeleniumServer.start(SeleniumServer.java:399)
    at login.testLogin(login.java:17)
    at sun.reflect.NativeMethodAccessorImpl.invoke0(Native Method)
    at sun.reflect.NativeMethodAccessorImpl.invoke(Unknown Source)
    at sun.reflect.DelegatingMethodAccessorImpl.invoke(Unknown Source)
    at java.lang.reflect.Method.invoke(Unknown Source)
    at junit.framework.TestCase.runTest(TestCase.java:168)
    at junit.framework.TestCase.runBare(TestCase.java:134)
    at junit.framework.TestResult$1.protect(TestResult.java:110)
    at junit.framework.TestResult.runProtected(TestResult.java:128)
    at junit.framework.TestResult.run(TestResult.java:113)
    at junit.framework.TestCase.run(TestCase.java:124)
    at junit.framework.TestSuite.runTest(TestSuite.java:232)
    at junit.framework.TestSuite.run(TestSuite.java:227)
    at org.junit.internal.runners.OldTestClassRunner.run(OldTestClassRunner.java:76)
    at org.eclipse.jdt.internal.junit4.runner.JUnit4TestReference.run(JUnit4TestReference.java:45)
    at org.eclipse.jdt.internal.junit.runner.TestExecution.run(TestExecution.java:38)
    at org.eclipse.jdt.internal.junit.runner.RemoteTestRunner.runTests(RemoteTestRunner.java:460)
    at org.eclipse.jdt.internal.junit.runner.RemoteTestRunner.runTests(RemoteTestRunner.java:673)
    at org.eclipse.jdt.internal.junit.runner.RemoteTestRunner.run(RemoteTestRunner.java:386)
    at org.eclipse.jdt.internal.junit.runner.RemoteTestRunner.main(RemoteTestRunner.java:196)


Solution for the above problem is , type the below in the browser URL and the server will be stopped
http://localhost:4444/selenium-server/driver/?cmd=shutDownSeleniumServer
Now your should be able to see the message "OKOK" in the browser window