
To Generate HTML reports using maven follow the below steps
1.Firstly we have to create a Maven Project using eclipse
2.Inorder to create a Maven Project in eclipse your eclipse should have maven plugin
3.To Download maven pulgin see below steps
4 . Open Eclipse and go to Help. Select Install New Software 
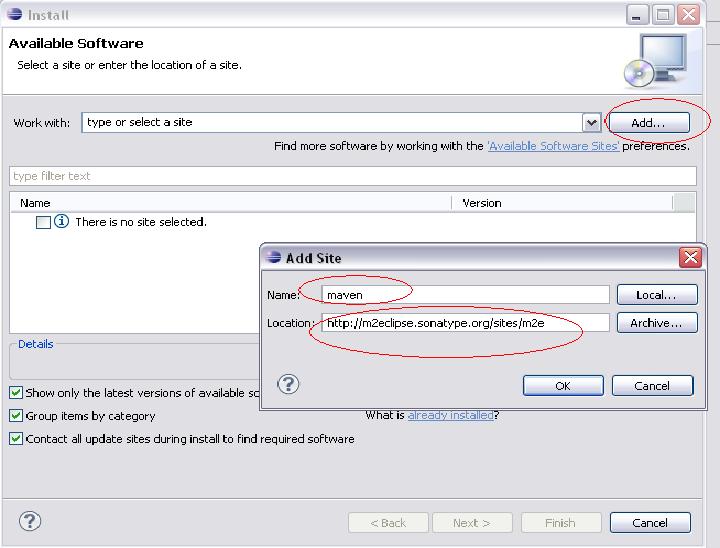
5.Click on add button. Now addsite dialog gets opened.
6.Provide the Name and Location and then click on ok button as shown in below snapshot
6. Wait for few seconds until the maven plugin is displayed in the list (refer below snap shot)
7. Select the checkbox option "Maven Integration for Eclipse" and click on Next Button
8. Select the plug in and click on Next Button as shown below
 | ||||||||
9. Accept the license agreement and click on Finish Button 

10.The download and installation happens in background as shown below

11.On Successful installation you would be prompted for eclipse restart. Accept the restart confirmation to restart your eclipse
12. Your eclipse is now plugged in with Maven plugin with which you can create Maven Projects
13. Ignore the console messages where eclipse tries to download maven plugins
14. Maven will create a .m2 (maven directory) folder in user directory where all the dependencies (jars are saved)
15. Go to user directory ex: C:\Documents and Settings\kiran\.m2.
16. Under .m2 directory you should see repository folder

17. Now your Eclipse is ready to create Maven Project
18. From here we will see creating Maven Projects in eclipse
19. In Eclipse navigate to File >> New Project >> Maven >> Maven Project
21. Select the default Group ID as shown in below fig and click on next

22. Provide groupid, artifactid and package as shown in below figure and click on Finish button

23. Now in you eclipse you should be able to see the Project in you eclipse package explorer

24. This project will have 2 src folders namely src/main/java for writing your AUT code and src/main/test for maintaining you Junit Tests
25 . Also you can see Maven Dependencies and a pom.xml
26. You Pom.xml is used to specify the required dependencies for your project (ex: selenium,junit ....)
27. By Default, Pom.xml will have a dependency of Junit 3.8.2 version. Change the version from 3.8.2 to Junit 4.0 and save the pom.xml. Now observe that you Maven dependencies will be updated to Junit 4 jar. So what ever dependencies you wish, you can provide the dependency in pom.xml. Maven will download the specified dependency from central repository and saves them in local repository C:\Documents and Settings\kiran\.m2\repository
<dependencies>
<dependency>
<groupId>junit</groupId>
<artifactId>junit</artifactId>
<version>4.0</version>
<scope>test</scope>
</dependency>
</dependencies>
</project>
28. From here we will create some Selenium Tests. So In your eclipse, under src/main/test directory, com.company package, create a Junit test class with name GoogleSearchTest.java. Delete or the default AppTest.java
package com.company;
import org.junit.AfterClass;
import org.junit.BeforeClass;
public class GoogleSearchTest {
@BeforeClass
public static void setUpBeforeClass() throws Exception {
}
@AfterClass
public static void tearDownAfterClass() throws Exception {
}
}
29. Now add some testcases to the above testClass . We will add two test methods(testcases) namely testGoogleSearch() and testGoogleAdvancedSeach(). Your test class looks like this
package com.company;
import org.junit.AfterClass;
import org.junit.BeforeClass;
public class GoogleSearchTest {
@BeforeClass
public static void setUpBeforeClass() throws Exception {
}
@AfterClass
public static void tearDownAfterClass() throws Exception {
}
@Test
public void testGoogleSearch(){
//To implement Selenium Tests here
}
@Test
public goid testGoogleAdvancedSearch(){
//To implement Selenium Tests here
}
}
Note** : Maven requires JDK1.5 and above . Configure eclipse with JDK 1.5 conpliance
30. Now we have to implement selenium tests in the two testmethods. For that we require Selenium RC Jars.
31. Open the pom.xml and ad the following dependency to Dependencies tag <dependencies></dependencies>
add the below dependency tag to your dependencies tag
<dependencies>
<dependency>
<groupId>org.seleniumhq.selenium</groupId>
<artifactId>selenium-remote-control</artifactId>
<version>1.0.1</version>
<type>pom</type>
</dependency>
<dependency>
<groupId>org.apache.maven.plugins</groupId>
<artifactId>maven-surefire-report-plugin</artifactId>
<version>2.5</version>
<type>maven-plugin</type>
</dependency>
</dependencies>
32 . also add plug in for html report generation
<reporting>
<plugins>
<plugin>
<groupId>org.apache.maven.plugins</groupId>
<artifactId>maven-surefire-report-plugin</artifactId>
<version>2.5</version>
<configuration>
<outputName>RadaptiveTestResults</outputName>
<includes>
<include>SmokeTest.java</include>
</includes>
</configuration>
</plugin>
</plugins>
</reporting>
33. On a whole your pom.xml should look like this (replace your pom.xml content with below xml content)
<project xmlns="http://maven.apache.org/POM/4.0.0" xmlns:xsi="http://www.w3.org/2001/XMLSchema-instance"
xsi:schemaLocation="http://maven.apache.org/POM/4.0.0 http://maven.apache.org/xsd/maven-4.0.0.xsd">
<modelVersion>4.0.0</modelVersion>
<groupId>com.company</groupId>
<artifactId>MyMavenProject</artifactId>
<version>0.0.1-SNAPSHOT</version>
<packaging>jar</packaging>
<name>MyMavenProject</name>
<url>http://maven.apache.org</url>
<properties>
<project.build.sourceEncoding>UTF-8</project.build.sourceEncoding>
</properties>
<dependencies>
<dependency>
<groupId>junit</groupId>
<artifactId>junit</artifactId>
<version>4.5</version>
<scope>test</scope>
</dependency>
<dependency>
<groupId>org.seleniumhq.selenium</groupId>
<artifactId>selenium-remote-control</artifactId>
<version>1.0.1</version>
<type>pom</type>
</dependency>
<dependency>
<groupId>org.apache.maven.plugins</groupId>
<artifactId>maven-surefire-report-plugin</artifactId>
<version>2.5</version>
<type>maven-plugin</type>
</dependency>
</dependencies>
<reporting>
<plugins>
<plugin>
<groupId>org.apache.maven.plugins</groupId>
<artifactId>maven-surefire-report-plugin</artifactId>
<version>2.5</version>
<configuration>
<outputName>GoogleSearchTestResults</outputName>
</configuration>
</plugin>
</plugins>
</reporting>
</project>
34 . Save the pom.xml. Now in your eclipse,under Project Explorer you should be able to see the selenium dependencies added as shown below

35. Now we have selenium dependencies and fill in the test methods with selenium implementations
36. Now we are ready with tests. How to generate HTML reports??
We will generate HTML reports from command prompt using maven commands. Before that to run maven commands from command promopt we should have maven jars.
37. Now go to the following link and download maven jars
http://www.apache.org/dyn/closer.cgi/maven/binaries/apache-maven-2.2.1-bin.zip
38.Extract the maven.zip on to you local directory
39.set Maven/bin path in system environment variables path
Open SystemProperties, click on advanced tab, edit the path and set the maven/bin in the path. click on ok button. See below

40.Maven requires JDK to execute the maven tasks. Set the JAVA_HOME USER variable
See below on how to set JAVA_HOME user variable

41. Apply the changes
42. Now to ensure that maven works, open the command prompt and type mvn -version
you should see the reponse some thing like this
Apache Maven 2.2.1 (r801777; 2009-08-07 00:46:01+0530)
Java version: 1.6.0_18
Java home: C:\Program Files\Java\jdk1.6.0_18\jre
Default locale: en_US, platform encoding: Cp1252
OS name: "windows xp" version: "5.1" arch: "x86" Family: "windows"
43.Now maven setup for command prompt is ready and from the command prompt change the directory where your Maven project pom.xml is located

45.On running the above command you should be able to see the below response in the command line console

47 Open GoogleSearchTestResults.html.You should see a beautiful HTML Test Report with Pass Faill Results

Awesome!!!!
ReplyDeleteVery helpful for beginners...
Great piece of work!!!!
Hi Kiran,
ReplyDeleteThanks for the nice post. I have a question. I followed all your steps till step 40 but after that when I entered the command to find the "mvn-version" I got the following message "'mvn-version' is not recognized as an internal or external command,operable program or batch file". And also, I could not find "E" drive in my system.
Could you please help.
Thanks in advance,
-Manu
Instead of E specify the path of Maven\bin of your local directory. In my case, I had extraced Maven in e:\software\maven\bin
ReplyDeleteHi Kiran,
ReplyDeletethis is a great article, tx u very much for sharing it. Very nice.
Hello Kiran,
ReplyDeleteThank you so much...You have written damn good... Amazing.. none of my team members could run... i could do it...
Waseem K
This is what we all needed... But i want to run multiple test cases in maven so that i get different reports.. i wrote two test cases but it's showing the report for only one report..
ReplyDeleteHelp from your side would be appreciated...
Thanks in advance....
Hi kiran thanks a lot fr sharing. In our team none could run maven, but your's is running fine :)))).
ReplyDeleteOne request is that, can you please share maven for testng. We could't do, aslo we tried to add testng instead of junit in dependency, but its not biulding. thanks in advance :)
Hi kiran super one man!!please share me ur gmail id i need lot more information from u!my mail iD is shashi_kumarsd@yahoo.com
ReplyDeleteHi Kiran.,
ReplyDeleteThanks for adding this Information For me it is very very help and useful. If igot any doubts can i ping u and give me ur mail id If u have any topics related to selenium.
My mail Id: chaitu.p07@gmail.com
Thanks,
Chaitu
Hey Kiran,
ReplyDeleteNice post man ......Really Helpful. Keep posting ...
Hi Kiran,
ReplyDeleteCan you elaborate more on step 35
Hi Kiran,
ReplyDeleteThank you for the post and it was very beneficial. I have come up to step 44 successfully. But when I type in mvn site on the following location of my project - P:\workspace\mymavcapsp\mvn site
system says 'MVN' is not recognized as an internal or external command......
I have the MVN jar file outside of this project folder under p:\workspace. Would that cause a conflit?
thanks
ReplyDeletevery good for beginners.......... was very helpful
Really very useful.
ReplyDeleteKudos to you Kiran for such a simple and descriptive Tutorial.
ReplyDeleteThis comment has been removed by the author.
ReplyDeleteHi Kiran,
ReplyDeleteRealy this is usefull to the beginers,
Could you please can you give the step by with screenshots steps to generate HTML report using maven for Web driver?
I am using now java+maven+Webdriver+Junit?
am unable to generate the HTML report in web driver as similer in selenium RC
Hi Kiran,
ReplyDeleteI tried all the steps mentioned above.
In command execution , no test is getting executed.
So I am getting
Results :
Tests run: 0, Failures: 0, Errors: 0, Skipped: 0
What could be the problem?
Can you please help me?
me too getting same results.. whats should we do now ? did u get solution nw ?
DeleteHi Sarita,
ReplyDeletePlease verify our testNG, have to suplied any test Case that you want to run in your testNG
Thanks
Ranjit
Hi,
ReplyDeleteNice blog. I have question when I run ANT and generate Junit reports
I see that the package name is shown as "None" and the class name is shown as Blank. Can you let me know as to what the issue is.
Regards
Prashanth
The updated URL is
ReplyDeletehttp://download.eclipse.org/technology/m2e/releases
This is really good.
ReplyDeleteI am having a problem .
I have more than 50 test cases , here maven execute all of them one by one , i need a way like we have in maven to make a suite class by Junit annotations and give that class name in build .xml , but here is am not having such help , please suggest ..
erhrpareek@gmail.com.
This is really good.
ReplyDeleteI am having a problem .
I have more than 50 test cases , here maven execute all of them one by one , i need a way like we have in ANT to make a suite class by Junit annotations and give that class name in build .xml , but here is I am not having such help , please suggest ..
erhrpareek@gmail.com.
i deleted apptest.java class... and created new test.. but its nt executing this class..
ReplyDeleteFollowing error is shown while running from cmd :
ReplyDelete[INFO] ------------------------------------------------------------------------
[INFO] BUILD FAILURE
[INFO] ------------------------------------------------------------------------
[INFO] Total time: 1.531s
[INFO] Finished at: Wed Jun 18 23:49:31 PDT 2014
[INFO] Final Memory: 10M/99M
[INFO] ------------------------------------------------------------------------
[ERROR] No plugin found for prefix ' compile exec' in the current project and in
the plugin groups [org.apache.maven.plugins, org.codehaus.mojo] available from
the repositories [local (C:\Users\dxxx\.m2\repository), central (http://re
po.maven.apache.org/maven2)] -> [Help 1]
[ERROR]
Have tired many solution from internet. Facing the same issue. when i run eclipse maven ,was able to execute without any issues. Pls help
Have changed the POM.xml.
Changed setting.xml
I think your post is very good, rather I would have liked to read a bit more about this topic because I think it is quite interesting. So i look forward to see next updates.
ReplyDeletebest web hosting | web hosting sites